
Tour Pack Mounting Rack and Docking Kit: Streamline Your Touring
Want to know a simple way to get two Harley Davidson motorcycles for the price of one? Just get yourself the Tour Pack rack mount and docking kit, which makes it super easy to remove or attach the tour pack to your bike. So, for shorter rides, cruising around town, or day trips, you ride without the Tour Pack. Going on an overnighter or a longer trip, the rack allows you to add the Tour Pack to your bike in no time and then remove it for safekeeping wherever you park for the night. It’s like carry-on luggage for your motorcycle!
Now to be clear, if you have a Tour Pack, you have both the rack mount and the docking kit to install it on your bike. You may be wondering why we (and everyone else) don’t bundle the tour pack, rack mount, and docking hardware together if you need them all. The reason is that the hardware required for installation differs from bike model to model. Some other installations, like a luggage rack or passenger backrest come with docking hardware, so you’ll already have it. Plus, you need a different rack depending on if you ride one-up or two-up.
Our website describes all the fitment options, but you can give us a call as well. Fortunately, the rack mount and the docking hardware are not expensive, and it’s an easy installation.
What is the Tour Pack Mounting Rack and Docking Kit?
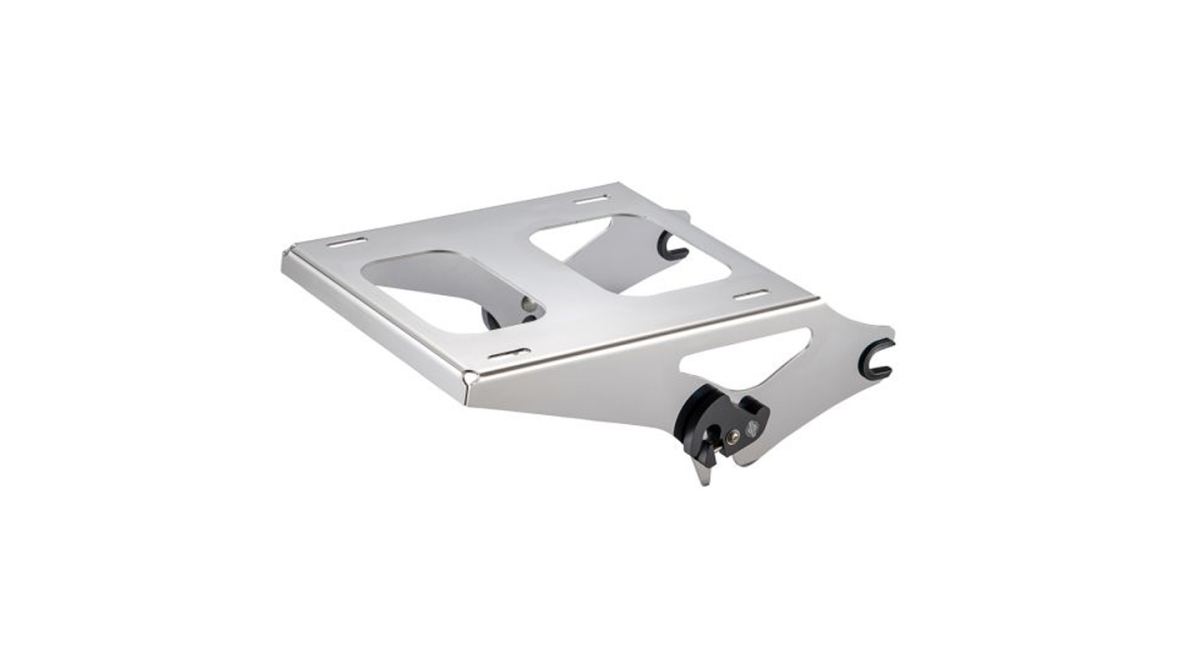
The rack mount is what installs on the bottom of your Tour Pack and allows it to attach to your bike. The docking kit is an assembly you install on your bike that holds the Tour Pack securely in place. The combination of the two allows for a quick, convenient detachment of the Tour Pack whenever you need to remove it. Also, the rack mount positions a Tour Pack behind the passenger, which acts as the backrest for your passenger.
Advanblack’s rack mounts and docking kits fit most Harley Davidson Touring/Softail models from ’97-’23, Sport Glides, Low Riders, Fat Bobs, and more. Just make sure the rack mount you order matches your riding configuration, either a one-up or two up.
How do I install the Mounting Rack and Docking Kit?
Before you get started, note that the rack mount attaches to your Tour Pack and the docking hardware goes on the rear fender assembly that holds your saddlebags, if you have them. Once the docking hardware is installed on your bike, the rack mount (and Tour Pack) pops on/off the docking assembly, with a spring-action, quick-detach mechanism on the rack mount. So you’ll have to install both the docking hardware to your bike and the rack mount to the bottom of your Tour Pack to complete the assembly.
As we said, if your bike has a passenger backrest already installed, you probably have the docking hardware already installed as well. Take a look at how your backrest is installed and it should match the 4-point docking system on the website. This comes in either black or chrome.
Let’s start with installing the docking hardware. The docking hardware comes with two metal spools, two metal-on-plastic spools, four spacers and two brackets that mount to your bike. You may not need these brackets if you have saddlebags. The spools and spacers will mount to the bracket that holds your saddlebags. If you have saddlebags, you’ll have to remove them, which is pretty easy.
Start with the front bolt on the saddlebag mount or the one that holds the backrest. Remove the bolt and slide a metal spool and spacer onto the bolt. The metal spool goes in front; the plastic spool goes in back. You’ll notice that the rack mount has a plastic slot in front where it slides onto the metal docking spool. A tip is to remember that metal always goes on plastic and plastic always goes on metal.
Once all four spools are attached, it’s easy to see how the rack mount fits. Simply push the front C-clips of the rack mount onto the front spool. The back brackets on the rack mount have springs. Just slide them up and the bracket snaps and locks into place. To remove the rack mount (and Tour Pack), just pull up on the springs to release the back part of the rack and pull it off.
Again, this docking hardware fits both the one-up and two-up rack mount. And, the rack mounts will fit any of the three sizes of Tour Packs – the Razor (small), the Chopped (medium), and the King (large). The installation of the mounting bracket on all three of these is the same. And as usual, any Tour Pack you buy will be color-matched to your bike’s color.
Note that if you have a low-rider, you’ll need to have a lay down license plate on the back. The OEM Harley Davidson version sticks up and you won’t be able to install the Tour Pack bracket.
Attaching the mounting bracket to your Tour-Pack is a little more involved, but not too hard. Steve the service technician has this helpful video to walk you through the entire mounting process.
Once you get all the hardware installed, you’ll love the new versatility your bike has and the convenience of being able to instantly remove or install the Tour Pack. You have the freedom to go on your favorite day trip without the Tour Pack or on a multi-day trip wherever the road takes you!