TIPS FOR A CLEAN INSTALL ON ADVANBLACK SADDLEBAGS AND EXTENDED FENDER
One of the more popular modifications for your Harley Davidson motorcycle is adding extended saddlebags and extended fenders. While this isn’t a plug-n-play install, it’s not difficult either. Just take your time and follow directions. Here are some tips on how to install Harley saddlebags, the extended fender, and getting a clean install to keep you from running into frustrating problems.
Swapping out the Saddlebag
The first thing is to learn how to remove the saddlebags from your Harley Davidson. Harley has made this super easy. Open the lid and you’ll see two quick-release knobs (different depending on your model). Unscrew the knobs and the saddlebag is released.
The next step is to remove the hardware from the old saddlebag and understand how to install Harley saddlebag hardware on the new saddlebags. It’s simple. Advanblack saddlebags are pre-drilled, so it’s just a matter of keeping track of the hardware you remove and re-installing it on the new saddlebags. Advanblack also includes some new hardware, such as rubber grommets, spacers, cushions, and plates, but you’ll need to swap out the screws and bolts from the old saddlebag and lid. Here are some more tips on how to install Harley saddlebag extensions.
Tip One – Be gentle with the quick-release grommet
We recommend swapping out the OEM quick-release rubber grommets with the ones Advanblack provides. You can use a short grip flathead screwdriver to work each grommet into the hole. But be gentle with this and take your time. If you’re too aggressive, you might slip and scratch the new saddlebag.
Tip Two – Use the Advanblack reinforcement latch plates
If you’re wondering how to install Harley Davidson saddlebag latches, use the four plates that come with Advanblack saddlebags. These plates reinforce the bolts that hold the lid to your saddlebag. Start by removing the 8 screws that hold the latch to each of the old saddlebags. Put the plate on the outside of the saddlebag and reinstall it.
Tip Three – Use soapy water as a lubricant for installing the rubber cushions
Your Advanblack saddlebags come with two cushions that replace the OEM cushions on the bottom of each bag. Each cushion has two nipples that will poke through holes on the bottom of the saddlebag. Soapy water can help you pull the nipple completely through the hole.
Tip Four – Watch this video to properly align the exhaust slip-ons for proper spacing
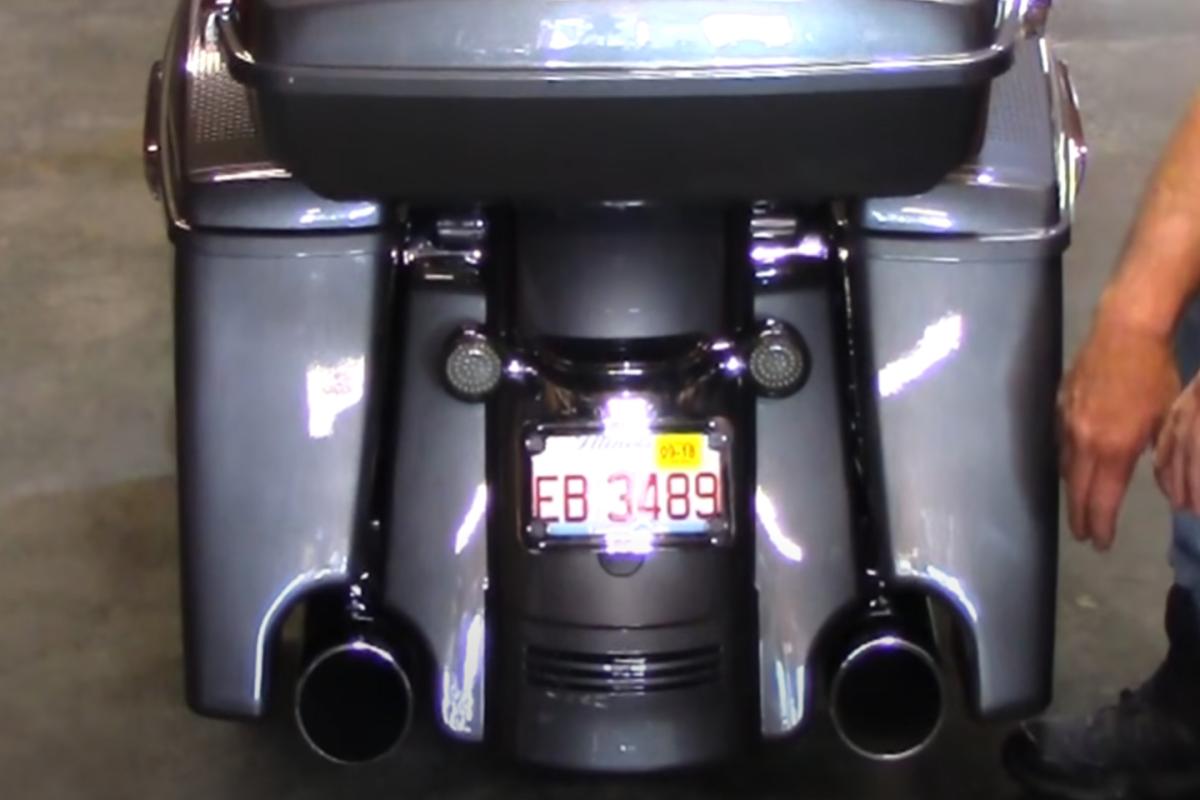
Once you get the new saddlebags installed, the spacing between the two rear exhaust pipes and your saddlebags and fender will probably not match and often the exhaust slip-ons will be touching the saddlebag or fender. DO NOT ride your motorcycle if this is the case. Adjusting the spacing is not difficult, but there are multiple steps and options. This video walks you through them.
Getting the extended fender to fit properly
The Advanblack extended fender looks incredible when it’s installed. Here are some tips on getting it to look perfect.
Tip One – The extended lip goes under the existing bracket
The extended fender is shaped like a big plastic “U”. On the bottom, it has a lip on it that must slide up underneath a bracket on the existing fender. It goes slightly under this bracket. This is easy to miss, and it causes headaches for the installation.
Tip Two – Get your turn signal out of the way
The turn signal assembly can get in the way of the installation. Just loosen the assembly and turn it sideways. There are only two bolts holding the turn signal bracket in place. Reach under the fender, loosen the bolts and you can rotate the bracket, so the lights are out of your way. You don’t have to take it all the way off but use a towel under it so you don’t scratch anything.
Tip Three – You can bend the arms of the extended fender to go over the mounting bolts
The extended fender is made from ABS plastic, which is rigid and durable, but it also has some flexibility. Slide the extended fender under the lip below the existing fender, and gently tap the bottom of the extended fender up until the arms of the extended fender reach the mounting bolts.
The tricky part now is the arms must go over two mounting bolts (one on each arm). Just pull the flexible arms of the extended fender apart and continue to tap up from the bottom until the bolts on the bike slide into the mounting holes on the extended fender.
Tip Four: Ask a Friend
You can do it by yourself but having a friend there can make this go more smoothly.
Start adjusting with the exhaust pipes.
Once the saddlebags and extended fender are installed, you’ll love them, but you may also notice a slight imbalance in the gap between the saddlebags and the exhaust and the extended fender. You won’t have noticed this with your stock bags because they sit on top of the exhaust, and you can’t tell if the gap is off one way or the other. Don’t be discouraged and start taking everything apart! A little tweak and torque will make a world of difference.
The good news is that if you have a gap, it’s almost always due to the exhaust pipes. When you drop extended bags beside the pipes, you can see that the gap is uneven. You might think the new saddlebags or the extended fenders are out of whack when it’s actually the exhaust.
Tip One – Loosen the bolts
The first thing to do is to loosen the bolts on the slip-ons. Then with a little arm torque you can line up your pipes a little better so the gap between the extended fender and the bags is more even.
Tip Two – Make sure you have a 4” exhaust pipe
Most of the exhaust systems have a 4” pipe, but on some exhaust mods like the Boneshaker, the pipe is actually 4.5” in some places. There’s not a lot of room for extended bags. It’s iffy at best if you expect there to be no rubbing. A 4” exhaust fits perfectly.
Tip Three – Adjust the saddlebag mount with a custom shim
If after moving the exhaust pipe you still have an uneven gap, you can make adjustments to the stretch saddlebag mount. Remember that you cannot move the mounting bar. It’s set. Any adjustments you make will be to the saddlebags and not the extended fender. You can actually make a custom shim using the rubber cushions that came from Advanblack with the saddlebag. Watch this video (@ 9:50) to get a clear view of how to make this shim yourself.
What you’re looking for is a nice, circular gap around the exhaust pipe tip as well as a uniform gap between the extended fender and stretch saddlebag. The gap should be wide enough that there’s no rubbing and wide enough to install plasma bars if you want that look.
Whether you work on the exhaust, the saddlebags, or both, you should have an even gap that looks great.
Interested in exterior saddlebag lights?
Advanblack has an awesome lighting package… Hyper LED Lights. Mounting these to your motorcycle is easy, but you have to remove the seat. So, if you want to knowhow to install Harley saddlebag lights, take a look at this install video.


